MS Word में Table का उपयोग associated data को systematically arrange करने के लिए किया जाता है। आप Table में Rows और Columns का उपयोग करके data को organized और readable format में show कर सकते हो।
MS Word में हम दो तरीकों से page पर table को insert कर सकते हैं। हम एक-एक करके दोनों तरीकों का उपयोग करना सीखेंगे।
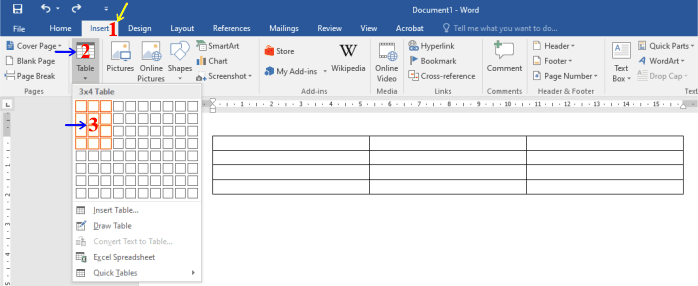
Method 1:
- Ribbon में “Insert” tab पर click करो।
- “Table” icon पर click करो, इससे एक grid show होगी।
- Mouse pointer को grid पर उस number of columns और rows तक ले जाओ, जितना आपको table में insert करना है।
- जब desired number of columns और rows highlight हो जाएं, तो mouse click करो ताकि उसी dimensions का table आपके document में insert हो जाए।
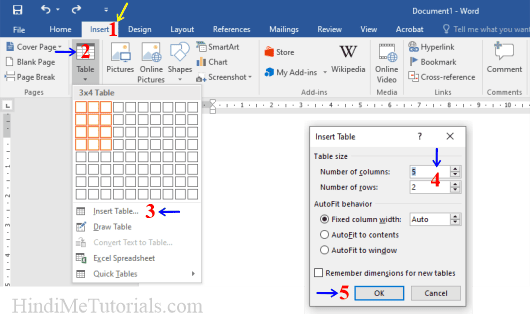
Method 2:
- Ribbon के “Insert” tab में “Tables” group में “Table” button पर click करो, फिर “Insert Table…” command select करो। इससे “Insert Table” dialog box open होगा।
- “Insert Table” dialog box में, “Table size” section में दिए गए boxes में table के लिए required number of columns और rows enter करो।
- “OK” button पर click करो ताकि specified dimensions वाला table आपके document में insert हो जाए।
Layout Tab in Table Tools
जब आप table को page पर insert कर देते हैं और आपका cursor table के अंदर होता है, तो आपको Ribbon पर Table Tools के नीचे दो नई tabs नज़र आएंगी—पहली Design tab और दूसरी Layout tab।
Design Tab में सिर्फ Table की स्टाइल से related options होते हैं, जिन्हें आप सीधे क्लिक करके समझ सकते हैं। हम यहाँ सिर्फ Layout Tab के जरूरी ऑप्शन और उनके इस्तेमाल को समझेंगे

1. Select: इस option की मदद से आप किसी specific cell, row, column या पूरी table को select कर सकते हैं। उदाहरण के लिए, अगर आपका cursor दूसरे column की किसी भी cell में है और आप Select option → Select Column पर क्लिक करते हैं, तो पूरा column select हो जाएगा।
2. View Gridlines: आप Home tab में मौजूद Border option की मदद से table के borders को hide (remove) कर सकते हैं। लेकिन अगर आप सिर्फ table की gridlines को show या hide करना चाहते हैं, तो View Gridlines option का उपयोग कर सकते हैं।
ध्यान दें: Gridlines सिर्फ table की structure visibility के लिए होती हैं, ये print नहीं होती हैं और सिर्फ table की cell boundaries को locate करने में मदद करती हैं।
3. Properties: इस option की मदद से आप table की position को set कर सकते हैं, यानी उसे page पर align (left, center, right) कर सकते हैं और text wrapping को set कर सकते हैं, जिससे text और table का layout बेहतर दिखे।
4. Draw Table: इस option की मदद से आप table में manually नई lines draw कर सकते हैं, जिससे आप customized cells, rows या columns create कर सकते हैं।
5. Eraser: इस option की मदद से आप table की rows या columns के borders को erase कर सकते हैं। इससे आप cells को merge (एक साथ जोड़ने) कर सकते हैं और table को अपने हिसाब से modify कर सकते हैं।
6. Delete: इस option की मदद से आप किसी specific cell, row, column या पूरी table को delete कर सकते हैं। उदाहरण के लिए, अगर आपका cursor दूसरे column की किसी भी cell में है और आप Delete option → Delete Columns पर क्लिक करते हैं, तो पूरा column delete हो जाएगा।
7. Insert Above: इस option पर click करते ही आपकी current row के ऊपर एक नई row insert हो जाएगी।
8. Insert Below: इस option पर click करते ही आपकी current row के नीचे एक नई row insert हो जाएगी।
9. Insert Left: इस option पर click करते ही आपके current column के बाईं तरफ एक नया column insert हो जाएगा।
10. Insert Right: इस option पर click करते ही आपके current column के दाईं तरफ एक नया column insert हो जाएगा।
11. Merge Cells: इस option पर click करते ही आपके द्वारा select की गई सभी cells एक साथ merge होकर एक single cell में बदल जाएंगी।
12. Split Cells: इस option की help से आप किसी single cell को multiple columns और rows में विभाजित (split) कर सकते हो।
13. Split Table: इस option की help से आप एक table को दो अलग-अलग tables में विभाजित कर सकते हो। आपका cursor जिस row में होगा, उसी row से table split हो जाएगी।
14. AutoFit: इस option की help से आप table और उसके columns की width को manage कर सकते हैं। इसमें तीन options होते हैं:
- AutoFit Contents: इससे table के सभी columns की width उसमें मौजूद content के हिसाब से अपने-आप adjust (autofit) हो जाती है।
- AutoFit Window: इससे table की width पूरे page के बराबर हो जाएगी।
- Fixed Column Width: Default रूप से, जब आप किसी column में बड़ा data type करते हैं, तो column की width अपने-आप बढ़ती रहती है। लेकिन अगर आप इस option पर click कर देते हैं, तो column की width fixed हो जाती है और ज्यादा content होने पर text उसी cell में next line में चला जाता है।
15. Height and Width: इन options की help से आप किसी selected row, column या पूरी table की width और height को कम या ज्यादा (adjust) कर सकते हैं।
16. Distribute Rows and Columns: इन options की click करते ही सभी columns की width और सभी rows की height एक बराबर हो जाती है।
17. Alignment: इस option की help से आप किसी selected cell, row या column के content को horizontally (Left, Center, Right) या vertically (Top, Middle, Bottom) align कर सकते हैं।
18. Text Direction: इस option से आप किसी selected cell, row या column के text की direction (जैसे horizontal से vertical) बदल सकते हैं।
19. Cell Margins: इस option की मदद से किसी selected cell, row या column के content और उसके borders के बीच के gap (margin) को adjust कर सकते हैं।
20. Sort: इस option की help से आप table के data को किसी एक column के आधार पर ascending या descending order में sort कर सकते हैं।
21. Repeat Header Rows: यदि आपकी table का data एक page से ज्यादा pages में आ रहा है और आप चाहते हैं कि हर page के top पर table की header row अपने आप दिखाई दे, तो इसके लिए header row को select करें और फिर इस option पर click करें। इससे header row हर नए page पर automatically repeat होगी।
22. Convert to Text: इस option की मदद से आप अपनी table को normal text में बदल सकते हैं। Conversion के दौरान, आप यह चुन सकते हैं कि columns और rows को अलग करने के लिए कौन सा separator (comma, tab, paragraph आदि) इस्तेमाल किया जाए।
23. Formula: इस option की मदद से आप किसी column या row में मौजूद numeric data पर गणितीय गणनाएँ (जैसे sum, count, max, min, average, product) कर सकते हैं।
Calculation करने के लिए, जिस cell में result चाहिए, उसे select करें और इस फिर option पर click करें। Formula window open होगी और अगर आपको formula change करना है तो कर दीजिये और फिर OK button पर click कर दीजिएगा।