MS Word में Indent, Sort और Show/Hide जैसे features, document की formatting और organization को आसान और प्रभावी बनाते हैं। आइए जानते हैं कि इनका सही उपयोग कैसे करें।
Indent in MS Word in Hindi
MS Word में Indent का इस्तेमाल paragraphs या lines को left या right side से adjust करने के लिए किया जाता है। Indent से text को visually organize किया जा सकता है। चलो जानते हैं की indent कैसे set करते हैं।
Types of Indentation
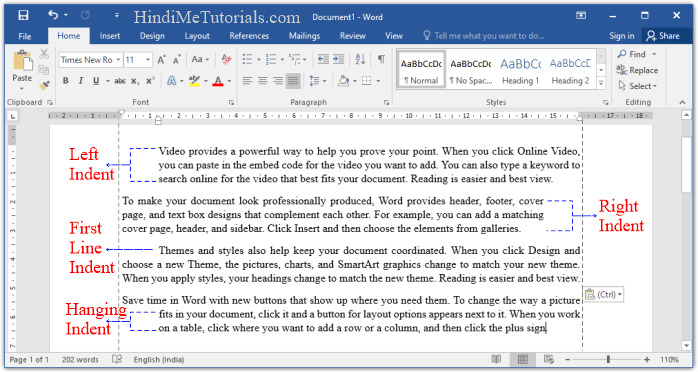
- Left Indent: इसमें पूरा paragraph left side से एक specific distance तक shift होता है।
- Right Indent: इसमें पूरा paragraph right side से एक specific distance तक shift होता है।
- First Line Indent: इसमें paragraph की सिर्फ पहली line को left side से आगे किया जाता है। बाकी lines सिर्फ normal होती है।
- Hanging Indent: इसमें paragraph की पहली line को छोड़कर बाकी सभी lines को left side से एक specific distance तक shift हो जाती हैं।
How to Apply Indentation
MS Word में विभिन्न प्रकार के Indentation को apply करने के लिए आप निम्नलिखित विधियों का उपयोग कर सकते हैं:
- Left Indent
- Home tab में जाएं।
- Paragraph group में Increase Indent या Decrease Indent बटन पर क्लिक करें।
- Increase Indent Shortcut Key: Ctrl + M
- Decrease Indent Shortcut Key: Ctrl + Shift + M
- Right Indent
- Layout tab > Paragraph group में जाएं।
- Indent section में Right Indent option का उपयोग करें।
- First Line Indent
- Paragraph की पहली लाइन की शुरुआत में क्लिक करें।
- Tab key दबाकर Indent जोड़ें।
- Shift + Tab दबाकर Indent हटाएं।
- Hanging Indent
- Paragraph में कहीं भी क्लिक करें।
- Ctrl + T दबाकर Hanging Indent लागू करें।
- Ctrl + Shift + T दबाकर Hanging Indent हटाएं।
Sort in MS Word in Hindi
MS Word में Sort option का उपयोग करके आप किसी list के डेटा को ascending (A to Z, 1 to 9) या descending (Z to A, 9 to 1) order में arrange कर सकते हैं।
Sorting के महत्वपूर्ण उपयोग:
- Alphabetically list को arrange करना – जैसे students या cities के नामों को A to Z या Z to A क्रम में सेट करना।
- संख्याओं (Numbers) को sort करना – जैसे marks list को छोटे से बड़े (ascending) या बड़े से छोटे (descending) क्रम में sort करना।
- तिथियों (Dates) को arrange करना – किसी dates list को newest to oldest या oldest to newest क्रम में arrange करना।
- Table के पूरे डेटा को किसी एक column के आधार पर sort करना – यदि table में कई कॉलम हैं, तो आप किसी एक कॉलम (जैसे नाम, अंक, या तिथि) के अनुसार पूरे टेबल के डाटा को sort कर सकते हैं।
Text and Number को कैसे Sort करें?
- सबसे पहले उस List (डाटा) को select करें जिसे Sort करना है।
- Home Tab > Paragraph Group > Sort Icon पर क्लिक करें।
- Sort Text Dialog Box Open होगा।
- Sort By:
- Paragraphs (Default)
- Text, Number ya Date Format Choose करें।
- Order Select करें:
- Ascending (A to Z)
- Descending (Z to A)
- OK पर क्लिक करें।
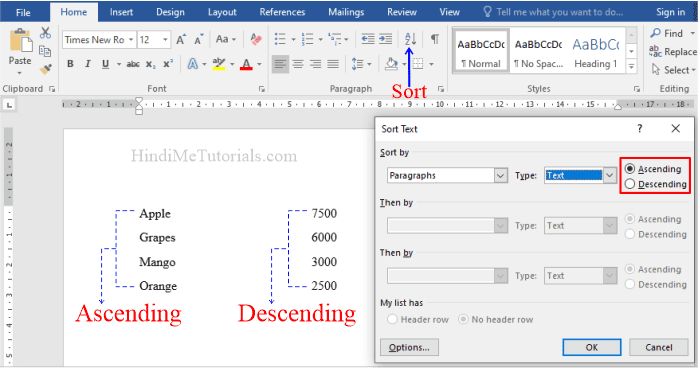
Example of Sorting a List:
Before Sorting:
- Mango
- Apple
- Banana
- Orange
After Sorting (Ascending):
- Apple
- Banana
- Mango
- Orange
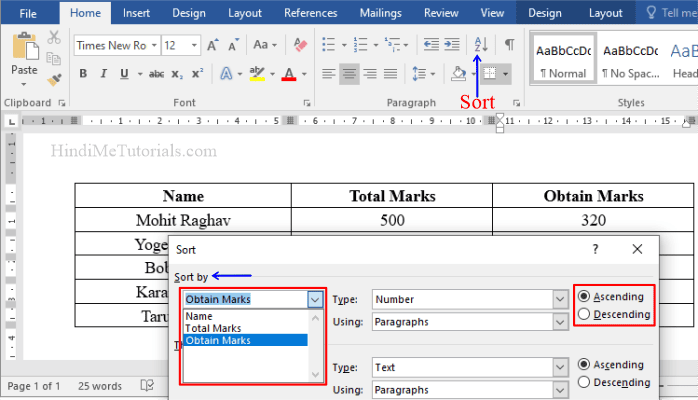
Table Data को कैसे Sort करें?
- सबसे पहले उस List (डाटा) को select करें जिसे Sort करना है।
- Home Tab > Paragraph Group > Sort Icon पर क्लिक करें।
- Sort Text Dialog Box Open होगा।
- अगर table में header row है तो:
- My table has Header row पर क्लिक करें।
- Sort By में column header select करें।
- अगर table में header row नहीं है तो:
- Sort by में column number select करें।
- Order Select करें:
- Ascending (A to Z)
- Descending (Z to A)
- OK पर क्लिक कर करें।
Show Hide in MS Word in Hindi
MS Word के अधिकांश users Show Hide option का उपयोग नहीं करते, क्योंकि उन्हें इसके कार्य और महत्व के बारे में जानकारी नहीं होती। हालांकि, यह एक ऐसा फ़ीचर है जो भले ही कम उपयोग होता हो, लेकिन बहुत महत्वपूर्ण होता है।
MS Word में Show/Hide option का उपयोग hidden formatting symbols को show या hide करने के लिए किया जाता है।
MS Word में Hidden Formatting Symbols डॉक्यूमेंट की फॉर्मेटिंग को कंट्रोल करने के लिए होते हैं। ये सिंबल्स आमतौर पर दिखाई नहीं देते, लेकिन Show/Hide (¶) फीचर का उपयोग करके इन्हें देखा और छिपाया जा सकता है।
Hidden Formatting Symbols, जैसे कि स्पेस (•), पैराग्राफ मार्क्स (¶), टैब (→), और लाइन ब्रेक (↵), print नहीं होते हैं, सिर्फ document की editing और formatting में help के लिए उपयोग होते हैं।
Hidden Formatting Symbols Show Hide कैसे करें?
- Home Tab में जाएँ।
- Paragraph Group में Show/Hide Icon (¶) पर click करें।
- Hidden Formatting Symbols Show या Hide हो जायेंगे।
- या फिर Keyboard Shortcut का use करें: Ctrl + Shift + 8
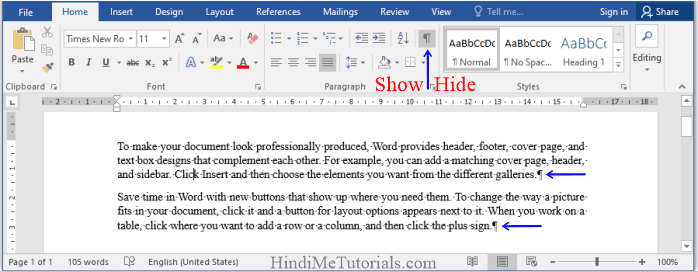
Practical Example:
- Without Show/Hide:
- “This is a sample document.”
- With Show/Hide Enabled:
- “This•is•a•sample•document.¶”